
AUTO-DJ Setup Guide
A walkthrough of getting a new AUTO-DJ stream up and running, from your first login through customizing the station and switching between SHOUTcast and Icecast.
Thank you for renting one of our AUTO-DJ streams. This guide walks through getting a new stream up and running. The whole process takes around 15 minutes the first time.
Step 1, Log into AzuraCast
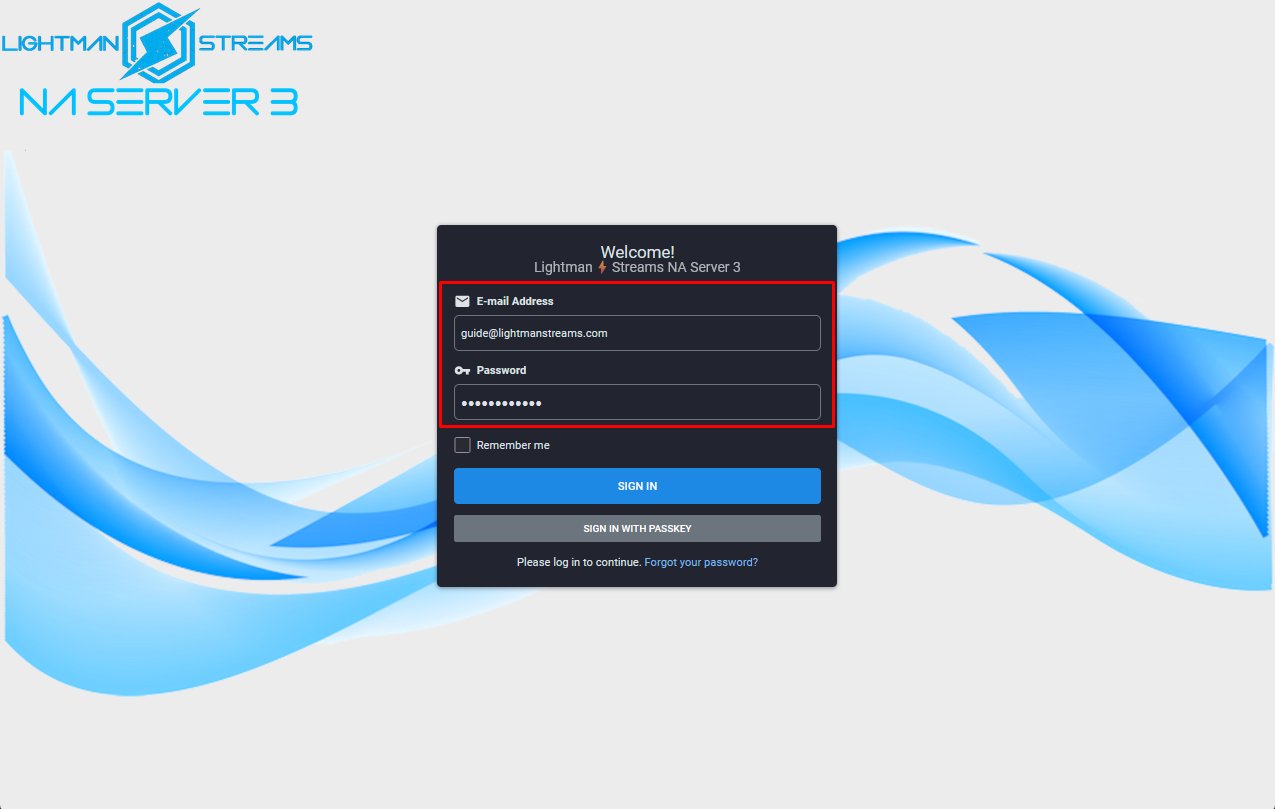
Go to the AzuraCast Dashboard login page for your assigned server. The exact URL is in the notecard you received in-world:
| Server | URL |
|---|---|
| EU | https://login-eu.lightmanstreams.com/login |
| NA1 | https://login-na.lightmanstreams.com/login |
| NA2 | https://login-na2.lightmanstreams.com/login |
| NA3 | https://na3.lightmanstreams.com/login |
- Copy/paste the email address from your notecard. This is not a real email, it's your username for the dashboard.
- Copy/paste the password from your notecard. The password is randomly generated and can be changed later under My Account.
- Click SIGN IN.
Step 2, Open the station management
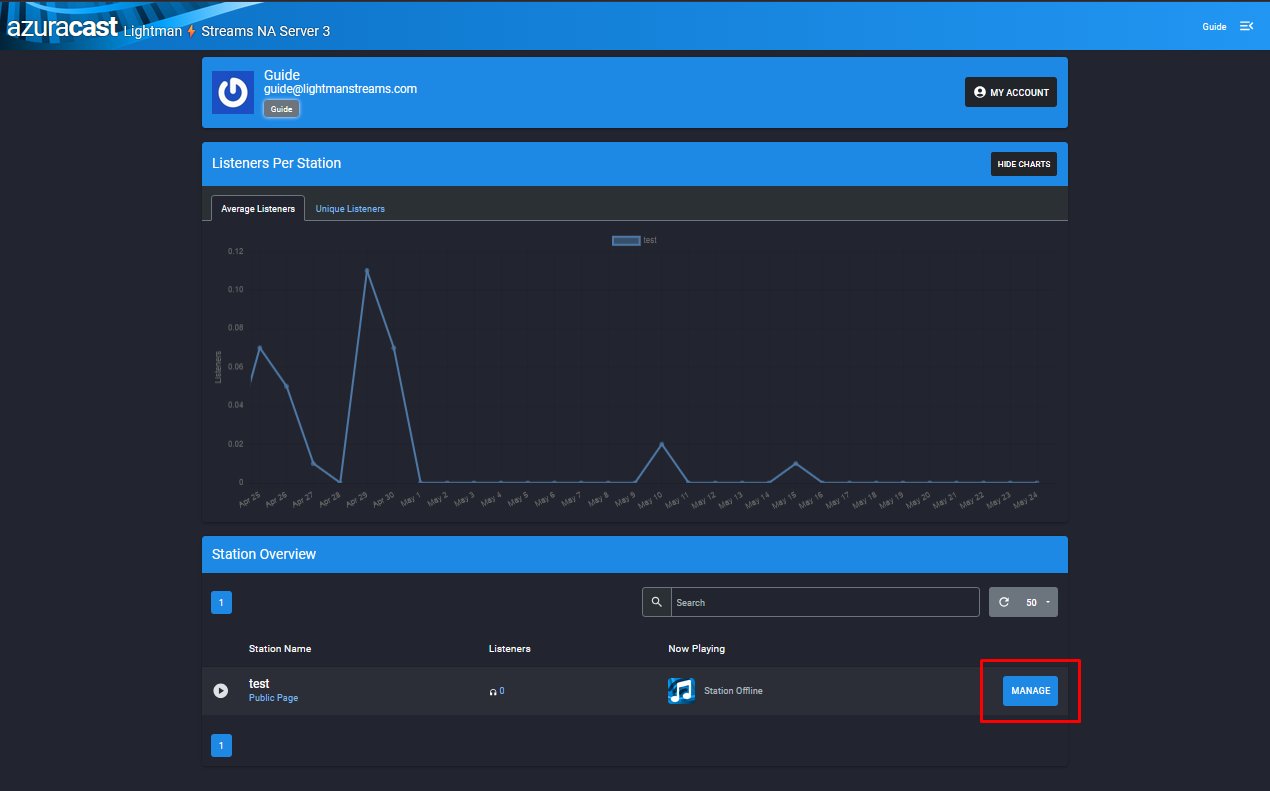
After login you'll see your account overview, including the Listeners Per Station chart and the Station Overview list at the bottom of the page.
- Find your station in the Station Overview list.
- Click the MANAGE button on the right.
Step 3, Upload music
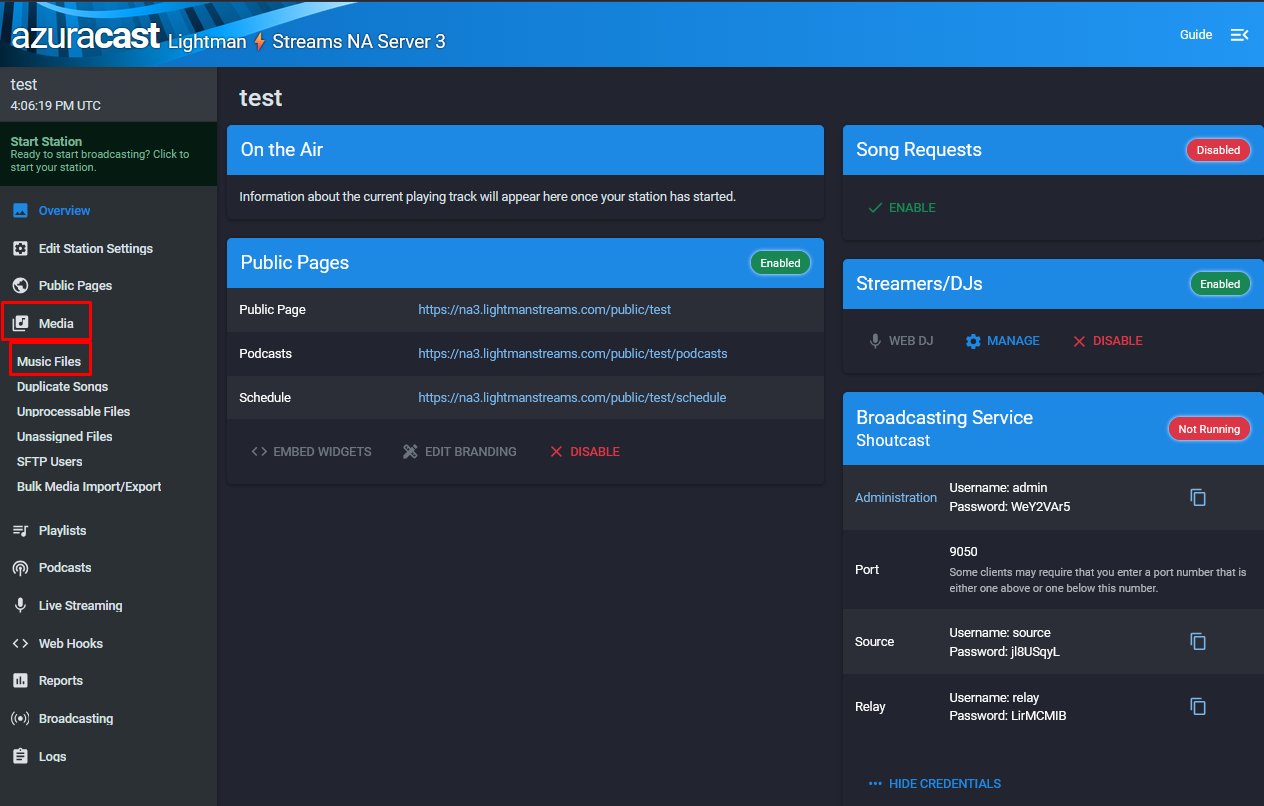
On a brand-new stream the station is offline because there's no music yet. The first thing to do is upload some.
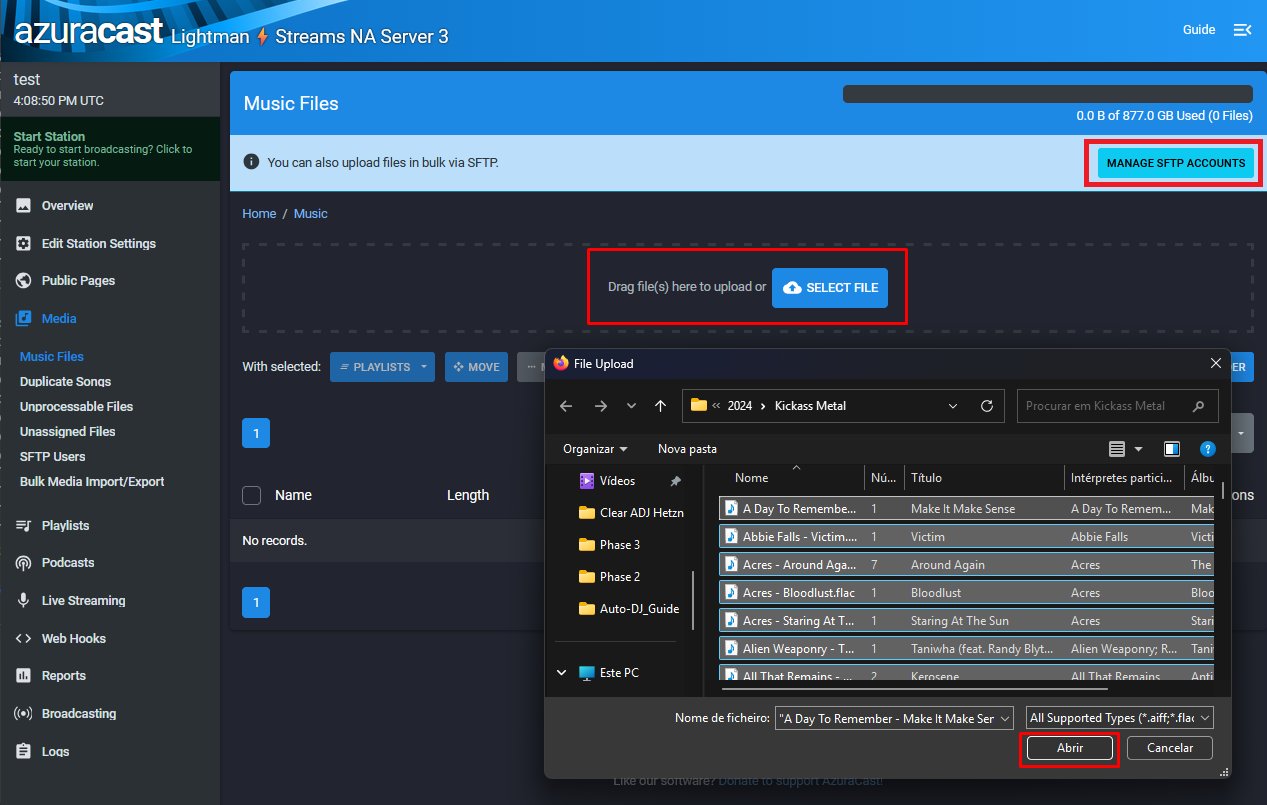
In the left sidebar, open Media, then click Music Files.
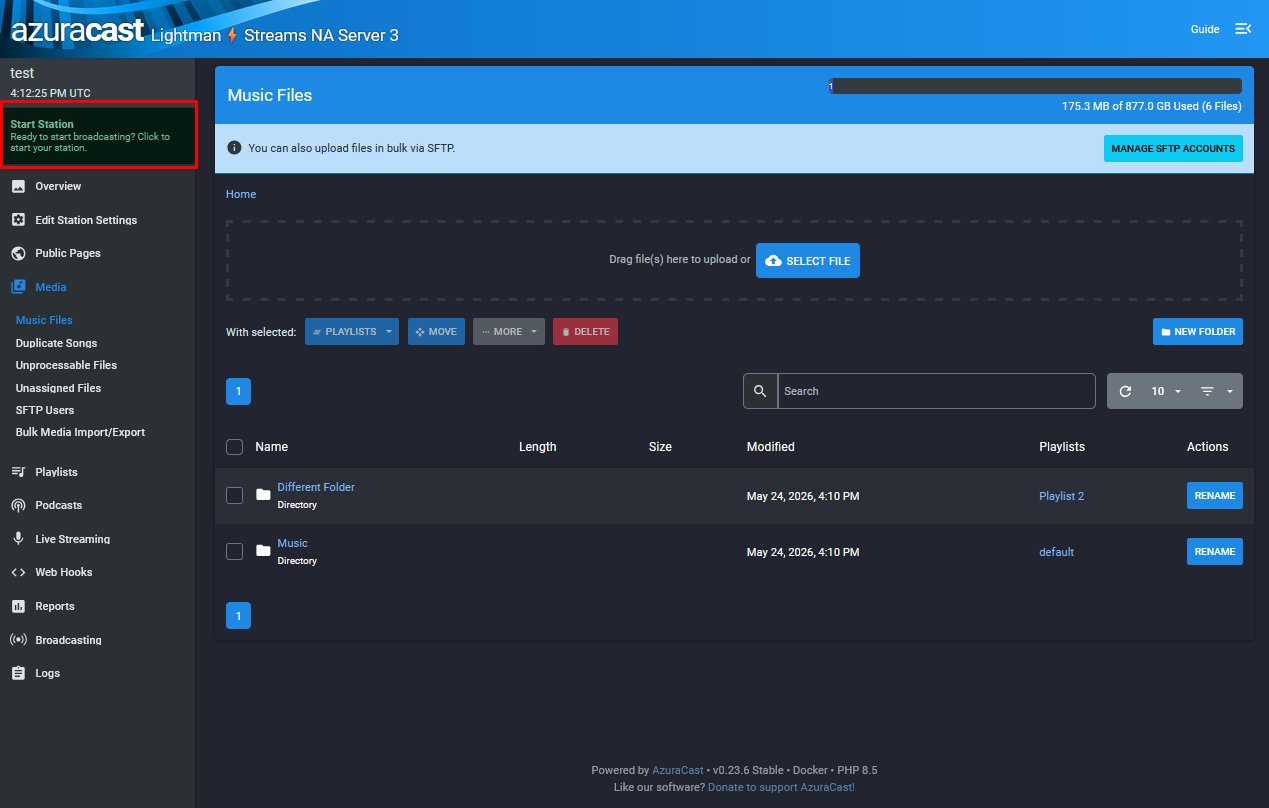
A folder named Music is already created and pre-assigned to the default playlist. Anything uploaded into this folder is automatically added to the default playlist, which is what plays when the station is running. You can use this folder for everything, or build your own folder structure if you prefer.
To use the pre-set folder, click Music to open it.
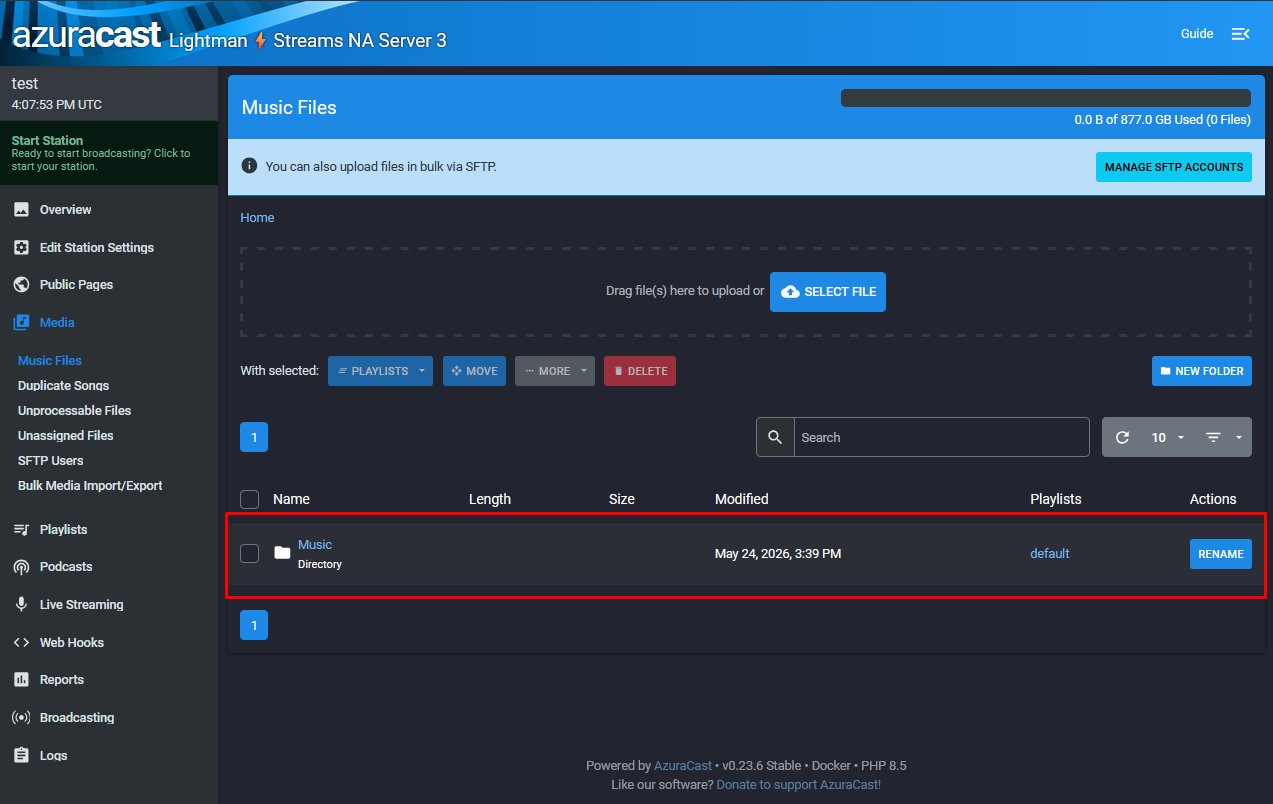
Inside the folder, you can upload music three ways:
- Click SELECT FILE to pick files from your computer.
- Drag and drop files onto the upload area.
- Use SFTP for bulk uploads (requires creating an SFTP account first, via MANAGE SFTP ACCOUNTS on the same page).
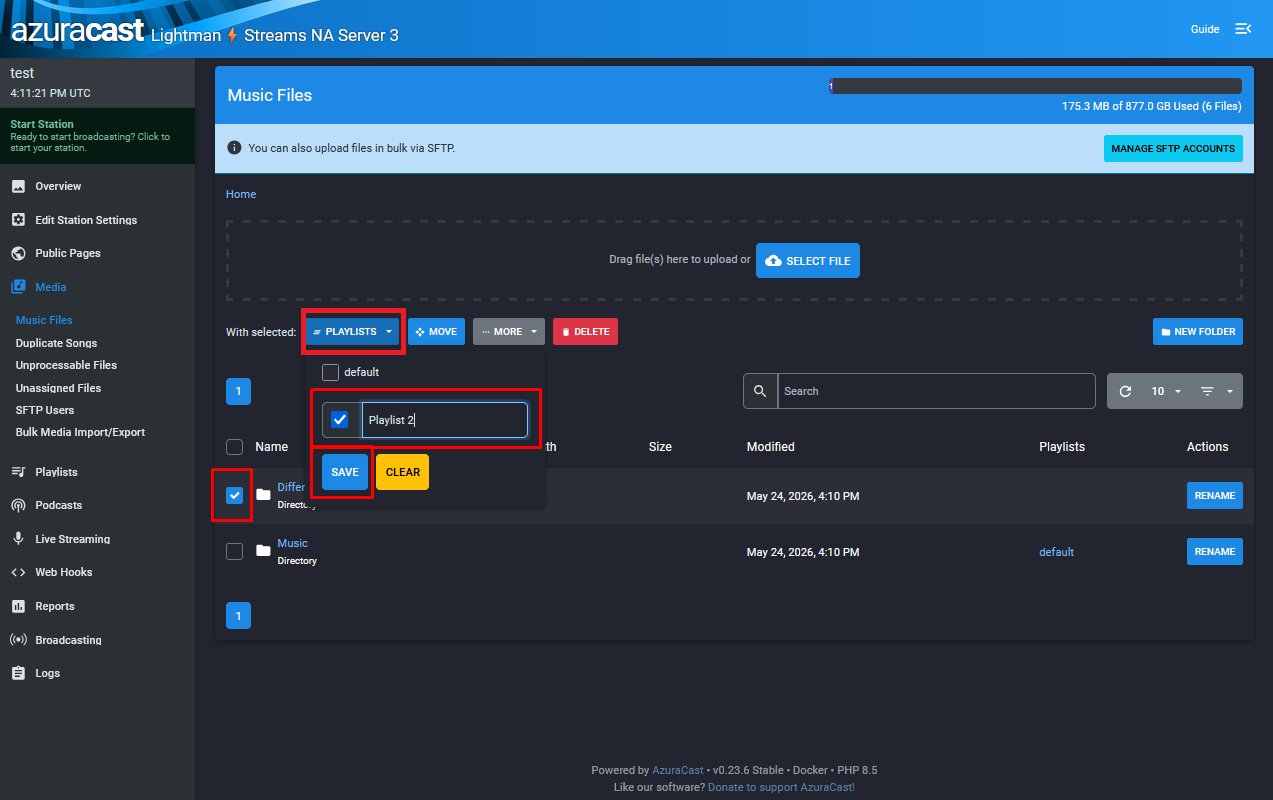
Using a folder other than
Music? If you upload to any other folder, the tracks won't play unless you manually assign them to a playlist. Select the folder (or individual tracks) by checking the box, click PLAYLISTS, check New Playlist, type a name, then click SAVE. Anything inside that folder, including sub-folders, will be added to the chosen playlist.
Step 4, Start the station
With music uploaded, the station is ready to start.
- Click the green Start Station tile at the top of the left sidebar.
- On the Update Station Configuration page, click RESTART BROADCASTING.
- Click RESTART BROADCASTING again on the confirmation prompt to proceed.
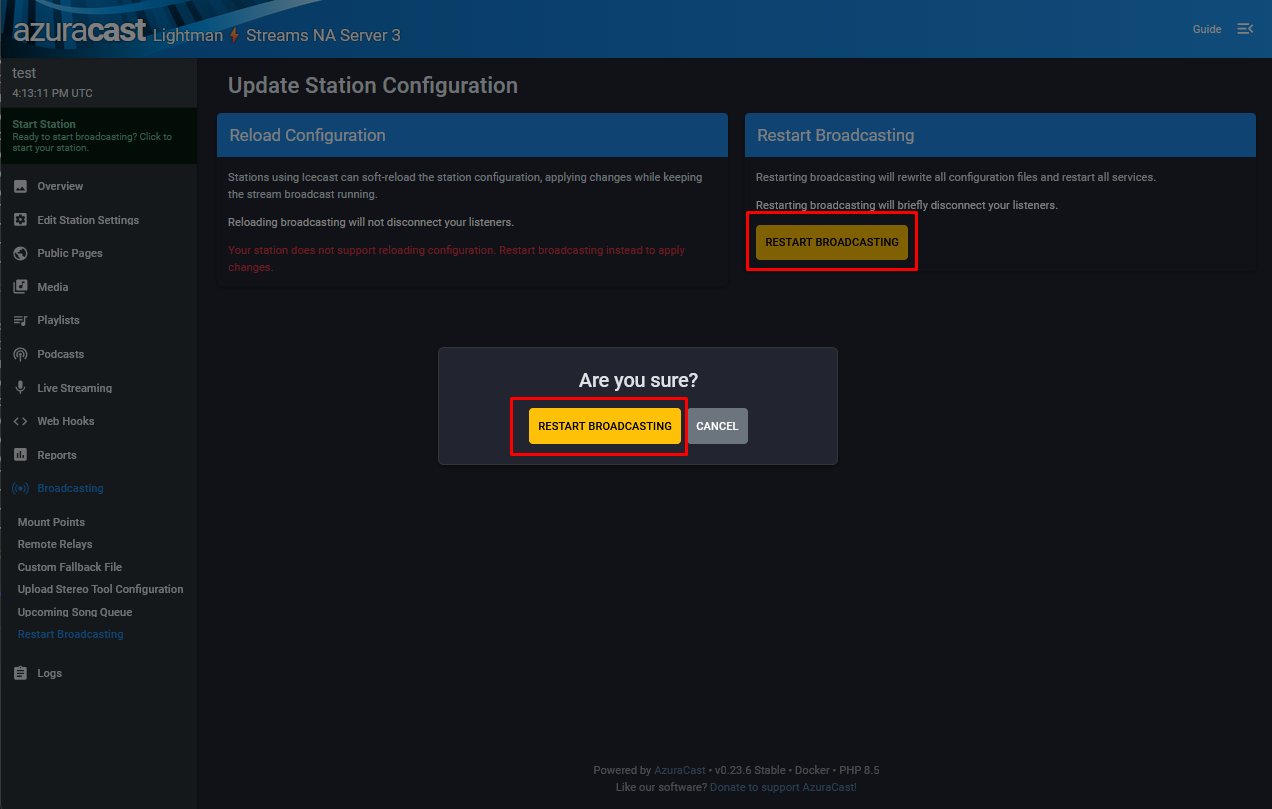
After a few seconds the station goes live. From now on, the station starts automatically. You only need to use Restart Broadcasting again if you change configuration that requires a restart.
Where Restart Broadcasting lives day-to-day: Once the station is running, you can find Restart Broadcasting in the left sidebar under Broadcasting → Restart Broadcasting.
Live DJ login
A live DJ can interrupt AUTO-DJ to broadcast in real time using software like Virtual DJ or MIXXX. When the live DJ disconnects, AUTO-DJ takes over again.
A default account named LiveDJ! is pre-configured. Credentials are in your notecard. To manage DJ accounts:
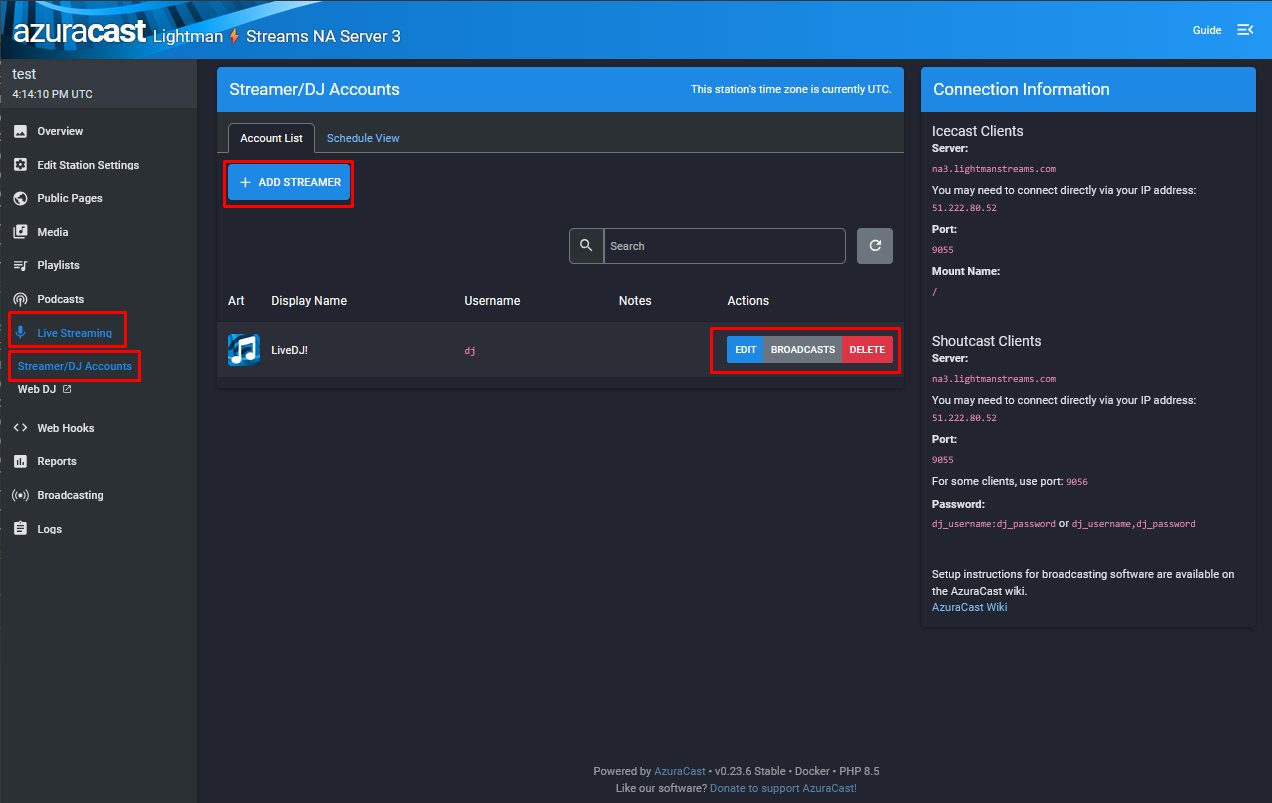
- In the left sidebar, open Live Streaming, then click Streamer/DJ Accounts.
- Edit the default
LiveDJ!account or click + ADD STREAMER to create a new one.
In the Add Streamer dialog, fill in:
- Streamer Username and Streamer Password, used by the DJ's broadcasting software to connect to the radio server.
- Streamer Display Name, shown in the public player when the DJ is live.
- Comments, optional internal notes only you can see.
- Make sure Account is Active is enabled.
Click SAVE CHANGES.
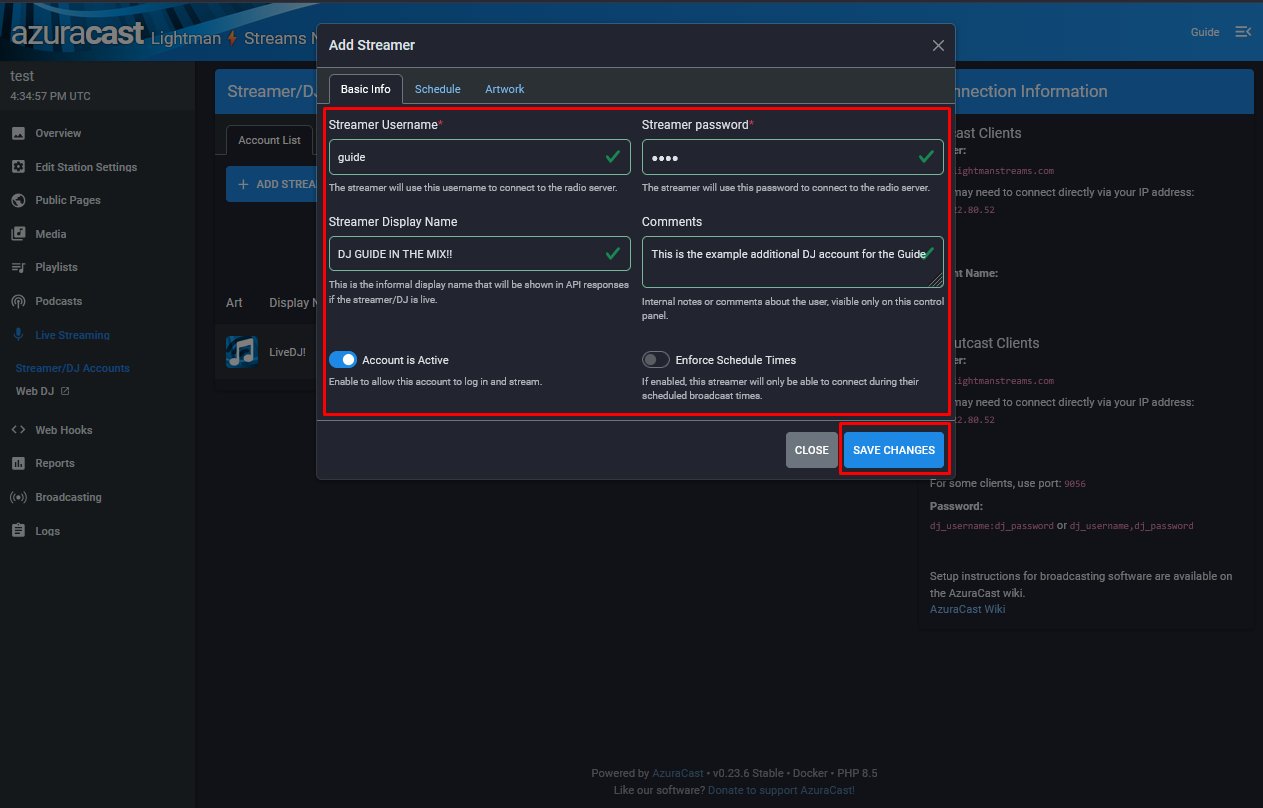
SHOUTcast password format: By default your station runs on SHOUTcast. A live DJ connecting must set their broadcasting software to SHOUTcast V1 and use the password in the format
username:password(DJ username and password separated by a colon, or a comma).
Station customization
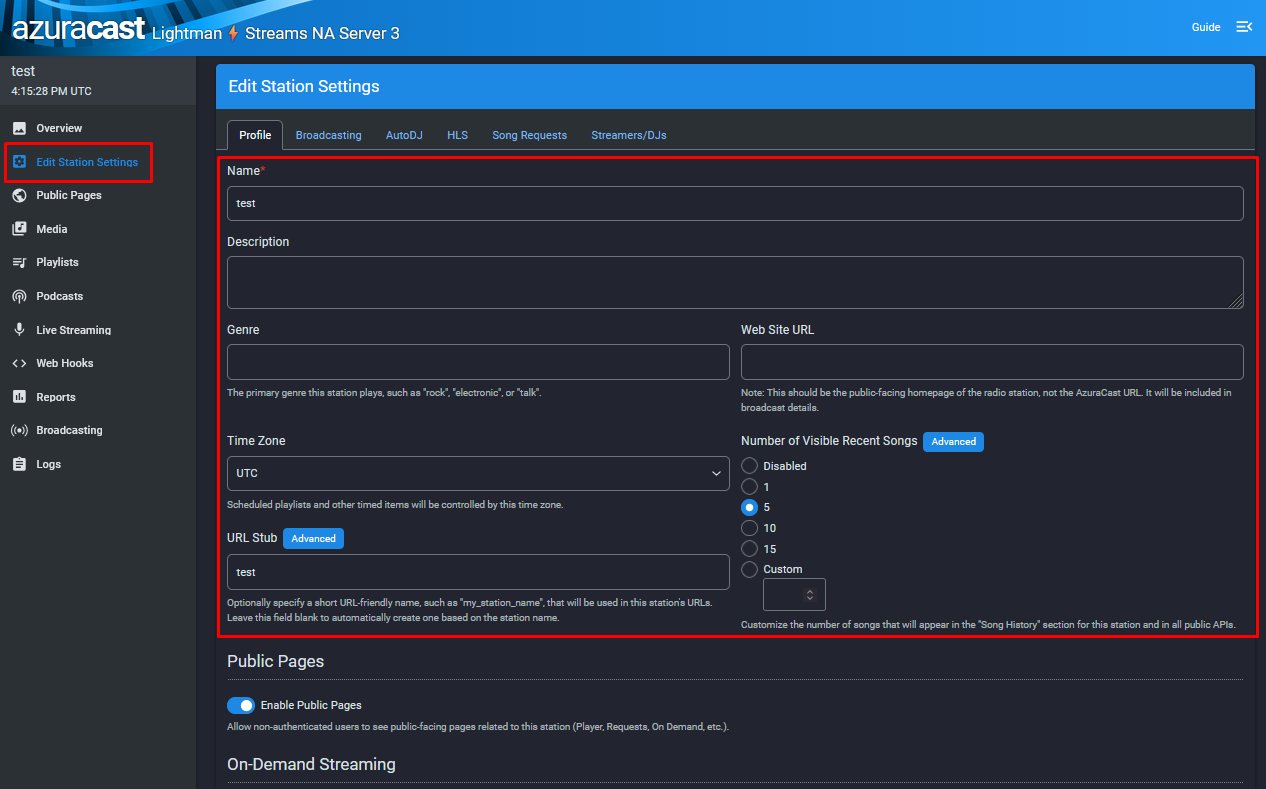
To rename the station, set a genre, or change the public-page URL:
- In the left sidebar, click Edit Station Settings.
- On the Profile tab, edit:
- Name, the station name shown on the dashboard, public pages, and player widgets.
- Description and Genre, optional metadata shown on the public page.
- Web Site URL, your station's homepage outside AzuraCast (if any).
- Time Zone, controls scheduled playlists and timed items.
- URL Stub, the slug used in your public-page URL. Setting this to
your_club_namechanges the public page fromhttps://login-eu.lightmanstreams.com/public/auto_dj_08tohttps://login-eu.lightmanstreams.com/public/your_club_name.
Click SAVE CHANGES at the bottom.
Station branding
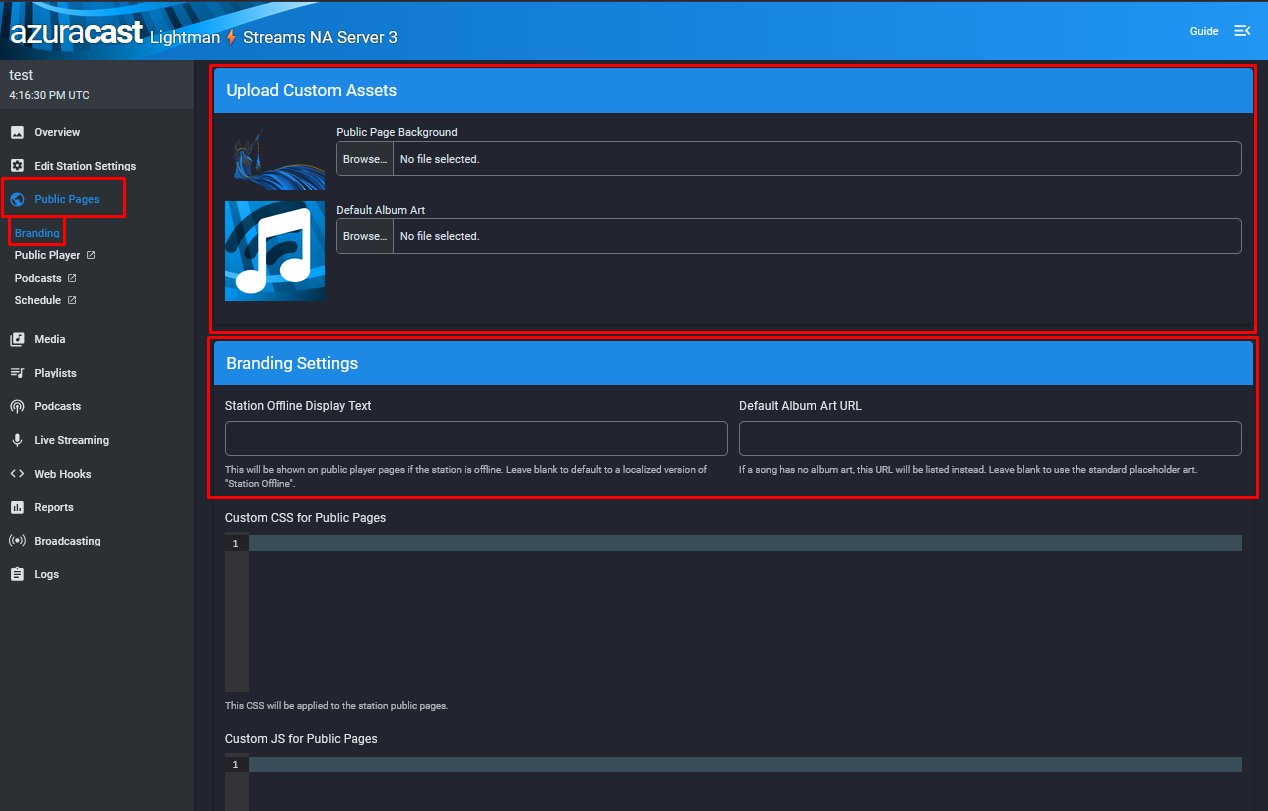
The public pages (the pages your listeners see at https://<server>/public/<your-url-stub>) can be branded with your own background image and default album art.
- In the left sidebar, open Public Pages, then click Branding.
- Under Upload Custom Assets, set:
- Public Page Background, the background image for the public player page.
- Default Album Art, shown when a track has no embedded album art.
- Under Branding Settings, set:
- Station Offline Display Text, shown to listeners when the station isn't broadcasting.
Click SAVE CHANGES at the bottom of the page.
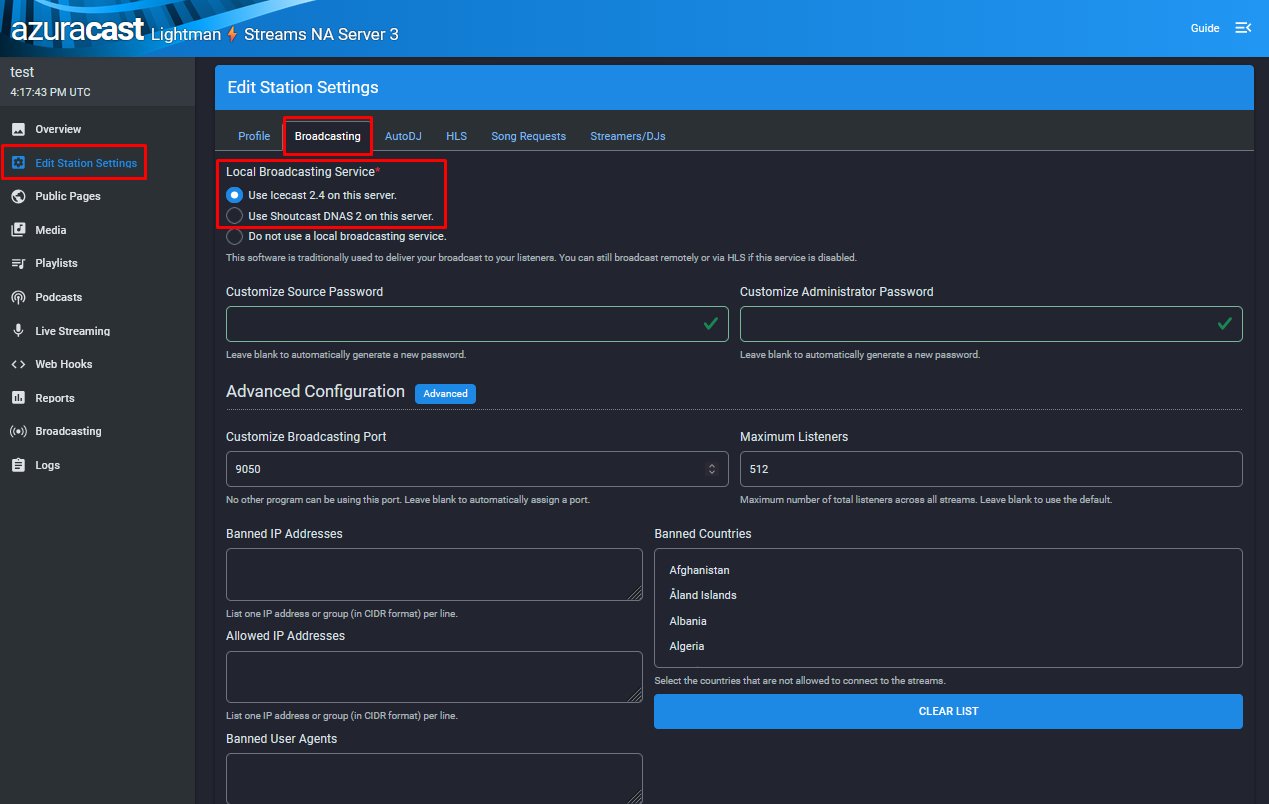
Switching SHOUTcast to Icecast
Your station runs on SHOUTcast by default. You can switch to Icecast, which is open-source and more current:
- Click Edit Station Settings in the left sidebar.
- Click the Broadcasting tab.
- Under Local Broadcasting Service, select Use Icecast 2.4 on this server.
- Click SAVE CHANGES.
Still stuck?
Reach out and we'll help you get unstuck.